

Continuing our discussion of this diagram from the previous lesson (0.4 -- Introduction to C++ development):
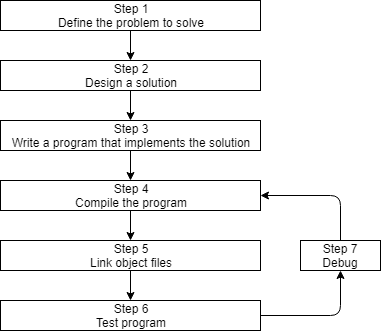
Let’s discuss steps 4-7.
Step 4: Compiling your source code
In order to compile a C++ program, we use a C++ compiler. The C++ compiler sequentially goes through each source code (.cpp) file in your program and does two important tasks:
First, it checks your code to make sure it follows the rules of the C++ language. If it does not, the compiler will give you an error (and the corresponding line number) to help pinpoint what needs fixing. The compilation process will also be aborted until the error is fixed.
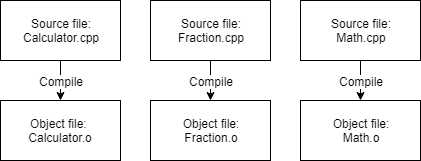
Second, it translates your C++ source code into a machine language file called an object file. Object files are typically named name.o or name.obj, where name is the same name as the .cpp file it was produced from.
If your program had 3 .cpp files, the compiler would generate 3 object files:
C++ compilers are available for many different operating systems. We will discuss installing a compiler shortly, so there is no need to do so now.
Step 5: Linking object files and libraries
After the compiler creates one or more object files, then another program called the linker kicks in. The job of the linker is three fold:
First, to take all the object files generated by the compiler and combine them into a single executable program.
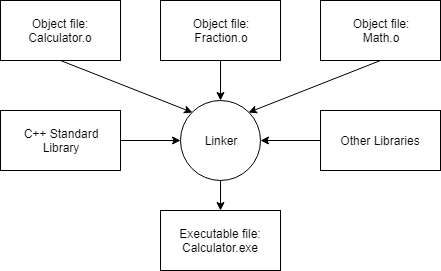
Second, in addition to being able to link object files, the linker also is capable of linking library files. A library file is a collection of precompiled code that has been “packaged up” for reuse in other programs.
The C++ core language is actually fairly small and concise (and you’ll learn much of it in these tutorials). However, C++ also comes with an extensive library called the C++ Standard Library (usually shortened to standard library) that provides additional functionality that you can use in your programs. One of the most commonly used parts of the C++ standard library is the iostream library, which contains functionality for printing text on a monitor and getting keyboard input from a user. Almost every C++ program written utilizes the standard library in some form, so it’s very common for the standard library to get linked into your programs. Most linkers will automatically link in the standard library as soon as you use any part of it, so this generally isn’t something you need to worry about.
You can also optionally link in other libraries. For example, if you were going to write a program that played sounds, you probably would not want to write your own code to read in the sound files from disk, check to ensure they were valid, or figure out how to route the sound data to the operating system or hardware to play through the speaker -- that would be a lot of work! Instead, you’d probably download a library that already knew how to do those things, and use that. We’ll talk about how to link in libraries (and create your own!) in the appendix.
Third, the linker makes sure all cross-file dependencies are resolved properly. For example, if you define something in one .cpp file, and then use it in another .cpp file, the linker connects the two together. If the linker is unable to connect a reference to something with its definition, you’ll get a linker error, and the linking process will abort.
Once the linker is finished linking all the object files and libraries (assuming all goes well), you will have an executable file that you can then run!
For advanced readers
For complex projects, some development environments use a makefile, which is a file that describes how to build a program (e.g. which files to compile and link, or otherwise process in various ways). Entire books have been written about how to write and maintain makefiles, and they can be an incredibly powerful tool. However, because makefiles are not part of the C++ core language, nor do you need to use them to proceed, we’ll not discuss them as part of this tutorial series.
Steps 6 & 7: Testing and Debugging
This is the fun part (hopefully)! You are able to run your executable and see whether it produces the output you were expecting!
If your program runs but doesn’t work correctly, then it’s time for some debugging to figure out what’s wrong. We will discuss how to test your programs and how to debug them in more detail soon.
Integrated development environments (IDEs)
Note that steps 3, 4, 5, and 7 all involve software (editor, compiler, linker, debugger). While you can use separate programs for each of these activities, a software package known as an integrated development environment (IDE) bundles and integrates all of these features together. We’ll discuss IDEs, and install one, in the next section.